If (and when) you choose to take Baldurs Gate 3’s Mountain Pass, you’ll come to the Rosymorn Monastery and the Githyanki Creche below it. As you climb the outside, you’ll find a room with a stained glass floor that is clearly a puzzle of some kind — but you won’t start getting clues about it until you travel to the lower floors and pick up the “Find the Blood of Lathander” quest. It turns out, the monastery houses a hidden holy relic, the powerful Blood of Lathander mace.
Our Baldur’s Gate 3Blood of Lathander guide will walk you through both halves of the puzzle to retrieve the powerful holy relic hidden below the Githyanki Creche in the Rosymorn Monastery.
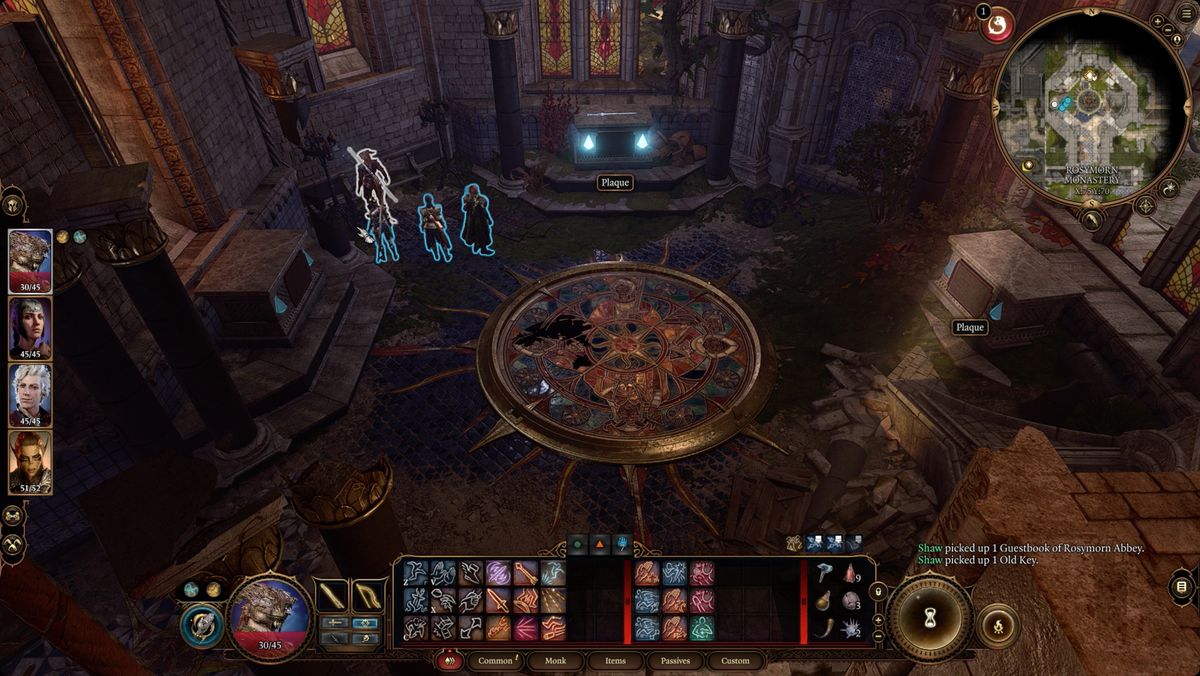
Find the Dawnmaster’s Crest
Your first stop on your way to the Blood of Lathlander will likely come before you pick up the quest. Near the top of Rosymorn Monastery, you’ll find a room with a large (and slightly broken) stained glass window on the floor surrounded by four plaques and altars.
Image: Larian Studios via Polygon
If you interact with the stained glass window, you’ll see four previous Dawnmasters of the Rosymorn Monastery and — more importantly — their weapons. If you check the altars, you’ll see that they’re named after the Dawnmasters. One of them — Dawnmaster Welkinglory’s to the northwest — has a glowing Ceremonial Longsword on it. Leave it there for now.
Your job is to head out and find two more ceremonial weapons (we’ll get to the third in a minute) — the Ceremonial Battleaxe and the Ceremonial Warhammer. Luckily, they’re relatively close by.
Find the Ceremonial Battleaxe
Head southeast out of the stained glass floored room and jump across the gap in the monastery’s roof. There’s a broken cabinet against a broken window there — smash through it and then climb inside.
Image: Larian Studios via Polygon
Defeat the Guardian of Faith in the room, and you’ll be able to retrieve the Ceremonial Battleaxe from the floor.
Find the Ceremonial Warhammer
Exit the stained glass room heading south and smash through the first wooden barricade along the west wall. Climb the knotted roots there to the roof, and then head east to find a pair of giant eagles. (You may have met an angry blue jay on your way to the monastery who told you about them.)
Image: Larian Studios via Polygon
It’s possible to talk your way past the eagles with a Speak with Animals spell or potion, but you’re probably going to end up fighting (and killing) them. Once they’re dealt with, grab the Ceremonial Warhammer from the nest.
Place the ceremonial weapons
Head back to the stained glass room. Your next task is to place the weapons on the appropriate altars. You can check the stained glass to see each Dawnmaster’s weapon, and then check the plaques for their names, or:
Dawnmaster Seed carries the Ceremonial Warhammer. Their altar is to the northeast.
Dawnmaster Vaseid carries the Ceremonial Greataxe — you can see everyone else’s so this is just process of elimination. Their altar is to the southwest.
You can stand on the altars and then drop the weapons from your inventory. Or you can open your inventory and right-click on the weapons. Choose throw and then aim it at the appropriate altar.
For the final altar — Dawnmaster Stockhold’s to the southeast — place literally any weapon. There’s even a few rusted weapons around the rooftops and those work here too.
When the weapons are all placed, a secret panel will open in the north wall. Open the pouch it reveals for the Dawnmaster’s Crest. You won’t need it for a little bit, though.
Optional: Find the Old Maintenance Records
Exit the Guardian of Faith’s room heading west — through the DC 15 locked door — and then take two lefts through the door to the south.
Image: Larian Studios via Polygon
There’s a book on the ground to the right with a clue for later — a note talking about greasing the machine.
Optional: Find the Blood of Lathlander Plaque
From the Old Maintenance Records, continue down the stairs. Smash through the wooden barricade to the west, and go through the door to the right. A little west of there, you’ll find the entrance to the Githyanki Creche.
Image: Larian Studios via Polygon
Before you walk in, check the plaque on the huge statue of Lathander to the north. This will officially give you the “Find the Blood of Lathander” quest.
Reach the Inquisitor’s Chambers
There’s a lot going on in the Githyanki Creche (and most of it doesn’t go well). For our purposes, though, you’re heading to the Captain’s Quarters in the northeast. Once you turn on the Githyanki Barrier Disruptor, you’ll be able to enter the Inquisitor’s Chamber.
The conversations inside go about as well as every other conversation you have, but after a fight, an argument with a god, and a quick jaunt to the Astral Sea, you’ll be able to explore.
Turn the Lathlander statues in the Inquisitor’s Chamber
Inside the Inquisitor’s Chamber, head to the west to find a pair statues. You can turn them, but the one on the left is stuck.
Image: Larian Studios via Polygon
If you read the plaques — always read the plaque — you’ll learn that the one on the right (north) is supposed to be blessing the rising sun and the one on the left (south) is saying a fond farewell to the setting sun. Your goal is to rotate them to face the appropriate direction.
For the freely moving statue on the right, turn it so it’s facing east, back the way you came — toward the main room of the Inquisitor’s Chamber.
For the one on the right, you need to hit it with Grease first (remember the Old Maintenance Note we found?) either from a bottle or as a spell. Once it’s greased, it’ll spin and you can face it to the west, toward the end of the hallway.
Deactivate the traps in the Secret Chamber
At the bottom of the stairs, you’ll enter a Secret Chamber. Your path forward is blocked, though. This time, you’ll need to deactivate some traps and destroy the energy sources of some barriers.
Image: Larian Studios via Polygon
The first energy source is hanging just to the left of the first barrier. It’s got 20 hit points, so just keep hitting it until it’s destroyed. The barrier will drop and you can pass.
Image: Larian Studios via Polygon
In the next room, you’ve got two challenges. First, you have to Disarm the Dawnbreaker trap with a DC 14 Sleight of Hand check. Be careful as you approach because this trap can and will wipe out your entire party.
Image: Larian Studios via Polygon
Once that’s done, look on the left (south) side of the hall to find a U-shaped path. Use that to go around the barrier. On the other side, disable another Dawnbreaker trap and destroy the energy source to drop the barrier you just went around.
Image: Larian Studios via Polygon
The final energy source is below you on the right (north) side of the hall.
Claim the Blood of Lathander
When you enter the final room, walk up to the Crest Panel and insert the Dawnmaster’s Crest.
Image: Larian Studios via Polygon
After a cutscene, you’ll be able to claim the Blood of Lathander mace — a magical mace with some healing properties that also lets you cast Sunbeam (and it’s a flashlight!).
The federal government is ordering the dissolution of TikTok’s Canadian business after a national security review of the Chinese company behind the social media platform, but stopped short of ordering people to stay off the app.
Industry Minister François-Philippe Champagne announced the government’s “wind up” demand Wednesday, saying it is meant to address “risks” related to ByteDance Ltd.’s establishment of TikTok Technology Canada Inc.
“The decision was based on the information and evidence collected over the course of the review and on the advice of Canada’s security and intelligence community and other government partners,” he said in a statement.
The announcement added that the government is not blocking Canadians’ access to the TikTok application or their ability to create content.
However, it urged people to “adopt good cybersecurity practices and assess the possible risks of using social media platforms and applications, including how their information is likely to be protected, managed, used and shared by foreign actors, as well as to be aware of which country’s laws apply.”
Champagne’s office did not immediately respond to a request for comment seeking details about what evidence led to the government’s dissolution demand, how long ByteDance has to comply and why the app is not being banned.
A TikTok spokesperson said in a statement that the shutdown of its Canadian offices will mean the loss of hundreds of well-paying local jobs.
“We will challenge this order in court,” the spokesperson said.
“The TikTok platform will remain available for creators to find an audience, explore new interests and for businesses to thrive.”
The federal Liberals ordered a national security review of TikTok in September 2023, but it was not public knowledge until The Canadian Press reported in March that it was investigating the company.
At the time, it said the review was based on the expansion of a business, which it said constituted the establishment of a new Canadian entity. It declined to provide any further details about what expansion it was reviewing.
A government database showed a notification of new business from TikTok in June 2023. It said Network Sense Ventures Ltd. in Toronto and Vancouver would engage in “marketing, advertising, and content/creator development activities in relation to the use of the TikTok app in Canada.”
Even before the review, ByteDance and TikTok were lightning rod for privacy and safety concerns because Chinese national security laws compel organizations in the country to assist with intelligence gathering.
Such concerns led the U.S. House of Representatives to pass a bill in March designed to ban TikTok unless its China-based owner sells its stake in the business.
Champagne’s office has maintained Canada’s review was not related to the U.S. bill, which has yet to pass.
Canada’s review was carried out through the Investment Canada Act, which allows the government to investigate any foreign investment with potential to might harm national security.
While cabinet can make investors sell parts of the business or shares, Champagne has said the act doesn’t allow him to disclose details of the review.
Wednesday’s dissolution order was made in accordance with the act.
The federal government banned TikTok from its mobile devices in February 2023 following the launch of an investigation into the company by federal and provincial privacy commissioners.
— With files from Anja Karadeglija in Ottawa
This report by The Canadian Press was first published Nov. 6, 2024.
LONDON (AP) — Most people have accumulated a pile of data — selfies, emails, videos and more — on their social media and digital accounts over their lifetimes. What happens to it when we die?
It’s wise to draft a will spelling out who inherits your physical assets after you’re gone, but don’t forget to take care of your digital estate too. Friends and family might treasure files and posts you’ve left behind, but they could get lost in digital purgatory after you pass away unless you take some simple steps.
Here’s how you can prepare your digital life for your survivors:
Apple
The iPhone maker lets you nominate a “ legacy contact ” who can access your Apple account’s data after you die. The company says it’s a secure way to give trusted people access to photos, files and messages. To set it up you’ll need an Apple device with a fairly recent operating system — iPhones and iPads need iOS or iPadOS 15.2 and MacBooks needs macOS Monterey 12.1.
For iPhones, go to settings, tap Sign-in & Security and then Legacy Contact. You can name one or more people, and they don’t need an Apple ID or device.
You’ll have to share an access key with your contact. It can be a digital version sent electronically, or you can print a copy or save it as a screenshot or PDF.
Take note that there are some types of files you won’t be able to pass on — including digital rights-protected music, movies and passwords stored in Apple’s password manager. Legacy contacts can only access a deceased user’s account for three years before Apple deletes the account.
Google
Google takes a different approach with its Inactive Account Manager, which allows you to share your data with someone if it notices that you’ve stopped using your account.
When setting it up, you need to decide how long Google should wait — from three to 18 months — before considering your account inactive. Once that time is up, Google can notify up to 10 people.
You can write a message informing them you’ve stopped using the account, and, optionally, include a link to download your data. You can choose what types of data they can access — including emails, photos, calendar entries and YouTube videos.
There’s also an option to automatically delete your account after three months of inactivity, so your contacts will have to download any data before that deadline.
Facebook and Instagram
Some social media platforms can preserve accounts for people who have died so that friends and family can honor their memories.
When users of Facebook or Instagram die, parent company Meta says it can memorialize the account if it gets a “valid request” from a friend or family member. Requests can be submitted through an online form.
The social media company strongly recommends Facebook users add a legacy contact to look after their memorial accounts. Legacy contacts can do things like respond to new friend requests and update pinned posts, but they can’t read private messages or remove or alter previous posts. You can only choose one person, who also has to have a Facebook account.
You can also ask Facebook or Instagram to delete a deceased user’s account if you’re a close family member or an executor. You’ll need to send in documents like a death certificate.
TikTok
The video-sharing platform says that if a user has died, people can submit a request to memorialize the account through the settings menu. Go to the Report a Problem section, then Account and profile, then Manage account, where you can report a deceased user.
Once an account has been memorialized, it will be labeled “Remembering.” No one will be able to log into the account, which prevents anyone from editing the profile or using the account to post new content or send messages.
X
It’s not possible to nominate a legacy contact on Elon Musk’s social media site. But family members or an authorized person can submit a request to deactivate a deceased user’s account.
Passwords
Besides the major online services, you’ll probably have dozens if not hundreds of other digital accounts that your survivors might need to access. You could just write all your login credentials down in a notebook and put it somewhere safe. But making a physical copy presents its own vulnerabilities. What if you lose track of it? What if someone finds it?
Instead, consider a password manager that has an emergency access feature. Password managers are digital vaults that you can use to store all your credentials. Some, like Keeper,Bitwarden and NordPass, allow users to nominate one or more trusted contacts who can access their keys in case of an emergency such as a death.
But there are a few catches: Those contacts also need to use the same password manager and you might have to pay for the service.
___
Is there a tech challenge you need help figuring out? Write to us at onetechtip@ap.org with your questions.
LONDON (AP) — Britain’s competition watchdog said Thursday it’s opening a formal investigation into Google’s partnership with artificial intelligence startup Anthropic.
The Competition and Markets Authority said it has “sufficient information” to launch an initial probe after it sought input earlier this year on whether the deal would stifle competition.
The CMA has until Dec. 19 to decide whether to approve the deal or escalate its investigation.
“Google is committed to building the most open and innovative AI ecosystem in the world,” the company said. “Anthropic is free to use multiple cloud providers and does, and we don’t demand exclusive tech rights.”
San Francisco-based Anthropic was founded in 2021 by siblings Dario and Daniela Amodei, who previously worked at ChatGPT maker OpenAI. The company has focused on increasing the safety and reliability of AI models. Google reportedly agreed last year to make a multibillion-dollar investment in Anthropic, which has a popular chatbot named Claude.
Anthropic said it’s cooperating with the regulator and will provide “the complete picture about Google’s investment and our commercial collaboration.”
“We are an independent company and none of our strategic partnerships or investor relationships diminish the independence of our corporate governance or our freedom to partner with others,” it said in a statement.
The U.K. regulator has been scrutinizing a raft of AI deals as investment money floods into the industry to capitalize on the artificial intelligence boom. Last month it cleared Anthropic’s $4 billion deal with Amazon and it has also signed off on Microsoft’s deals with two other AI startups, Inflection and Mistral.


:no_upscale()/cdn.vox-cdn.com/uploads/chorus_asset/file/24844480/Baldur_s_Gate_3_Blood_of_Lathander_Ceremonial_Battleaxe.png)
:no_upscale()/cdn.vox-cdn.com/uploads/chorus_asset/file/24844508/Baldur_s_Gate_3_Blood_of_Lathander_Ceremonial_Warhammer.png)

:no_upscale()/cdn.vox-cdn.com/uploads/chorus_asset/file/24844717/Baldur_s_Gate_3_Blood_of_Lathander_Old_Maintenance_Notes.jpg)
:no_upscale()/cdn.vox-cdn.com/uploads/chorus_asset/file/24844718/Baldur_s_Gate_3_Blood_of_Lathander_statue_plaque.jpg)
:no_upscale()/cdn.vox-cdn.com/uploads/chorus_asset/file/24844724/Baldur_s_Gate_3_Blood_of_Lathander_Inquisitors_Chamber_statues.jpg)
:no_upscale()/cdn.vox-cdn.com/uploads/chorus_asset/file/24844729/Baldur_s_Gate_3_Blood_of_Lathander_Secret_Chamber_1.jpg)
:no_upscale()/cdn.vox-cdn.com/uploads/chorus_asset/file/24844730/Baldur_s_Gate_3_Blood_of_Lathander_Secret_Chamber_2.jpg)
:no_upscale()/cdn.vox-cdn.com/uploads/chorus_asset/file/24844733/Baldur_s_Gate_3_Blood_of_Lathander_Secret_Chamber_3.jpg)
:no_upscale()/cdn.vox-cdn.com/uploads/chorus_asset/file/24844735/Baldur_s_Gate_3_Blood_of_Lathander_Secret_Chamber_4.jpg)
:no_upscale()/cdn.vox-cdn.com/uploads/chorus_asset/file/24844737/Baldur_s_Gate_3_Blood_of_Lathander_Secret_Chamber_5.jpg)