

Tech
Five Tips for Easier Rearranging of iOS Apps – TidBITS
After Josh Centers wrote “iOS 14’s App Library: The FAQ” (9 September 2020), we got a great response in the comments. Several people noted that they have long relied on a technique not dissimilar to the App Library, in that they devote one or more Home screens to a carefully organized set of folders that contain all their less-used apps. I admire such attention to detail, and in an ideal world, I’d use a similar approach.
However, I have 352 apps installed (check your number in Settings > General > About). Since the loss of the organizational tools in iTunes, the immense effort in dragging hundreds of icons around has dissuaded me from cleaning things up. Adding Home screen widgets in iOS 14 can also mess up app organization—something I did while playing with widgets deleted about half of my folders on one Home screen. So I was stoked to read John Clark’s post explaining how to move multiple apps at once. Even better, as soon as I started using multiple fingers, I discovered yet another app rearrangement tip that makes life much easier.
So, as welcome as iOS 14’s App Library may be for many of us, particularly alongside being able to hide Home screens, here is a collection of tips that will help anyone rearrange their app icons more easily, regardless of iOS version or device.
The Basics
First, let’s make sure we’re all on the same page.
- To move an app, start by touching and holding it. In recent versions of iOS, you can start dragging the app as soon as you feel a click, or you can pause until you see a popover, in which you can tap Edit Home Screen. In earlier versions of iOS, you’d touch and hold until you entered jiggle mode. (Interestingly, the Apple Style Guide is clear that it’s not “wiggle mode.”) Drag the app to the desired location.
- To put the app on a different Home screen, drag to the left or right edge of the screen and pause briefly to switch screens.
- To create a new folder, drag one app on top of another and pause briefly. Rename the folder as desired.
- To put an app in a folder, drag it into the folder. If you pause over the folder, it opens, and you can drag the app into place within the folder or even to other pages within the folder.
- To delete a folder, drag all the apps in it to another folder or Home screen.
- When you’re done, press the Home button or swipe up from the bottom of the screen to leave jiggle mode.
Want to see a demo of this? Josh Centers whipped up this quick video.
[embedded content]
Clear Space on the Dock and Use It as a Temporary Holding Zone
This tip isn’t new, but it’s worth repeating. If you’re doing a lot of app cleanup across multiple Home screens, dragging the app a long distance can be tiring and frustrating, particularly if you end up hovering over another app just slightly too long and invoking the folder creation process.
But if you think about it, you can save yourself a lot of the stress of moving apps by moving one or more of your Dock apps to a temporary spot and then using the Dock as a holding zone. You can then put some number of apps on the Dock, navigate to the desired Home screen, and drag them out in multiple small steps, without having to keep your finger down the entire time.
It’s much faster than moving each app, one a time, especially if you have a lot of Home screens.
Josh made another short video to show how this works.
[embedded content]
Move a Stack of Apps All at Once
John Clark’s tip takes the idea of working with multiple apps to a higher level, letting you assemble a stack of apps and put them in a new location with a single drop. Here’s how.
Start by moving one app. Once you’ve picked it up, I recommend dragging it to the lower-right corner of its Home screen. That’s not necessary, but it makes seeing what you’re doing easier. Without letting go of the app you’ve picked up, using another finger (from your other hand, most easily) to tap additional apps that are jiggling. Each app you tap is added to the stack you’re holding, and a blue badge increments to tell you how many are in the stack. Repeat as many times as you like—I found no limit to the number of apps you can stack up like this. You can also drag the stack to other Home screens to add icons from them as well.
Once you’ve assembled your stack, drag it to the desired location and lift your finger to drop the icons. They’ll fill in the destination folder or Home screen from left to right, top to bottom, in first in-first out order.
This snazzy tip would be great just for dumping apps in folders quickly to reduce the number of Home screens you have.
For a demonstration of how this works, see Josh’s video.
[embedded content]
Swipe to Change Home Screens While Dragging
John’s tip got me started using both hands to rearrange apps, something I’d never done before. But once I did, I stumbled on a tremendously useful and painfully obvious (well, it is now, anyway) tip.
Dragging an app or a stack of apps from Home screen to Home screen is slow and error-prone. All too often you end up hovering too long over another app, which causes iOS to try to create a folder. The only way out is to drop the app in the folder, pick it up again, and drag it out. Maddening!
But here’s the thing. If you start dragging an app or a stack with one hand and then use a finger on the other hand to swipe left and right to move between Home screens, it’s vastly easier. In essence, you’re moving the Home screen underneath the app or stack you’re holding. If you hold the app or stack in the lower-right corner, it’s easy to see everything that’s on each Home screen you reveal, and there’s no worry about hovering over another app or accidentally entering a folder.
Is this not quite clear from my description? Josh’s video will give you a preview.
[embedded content]
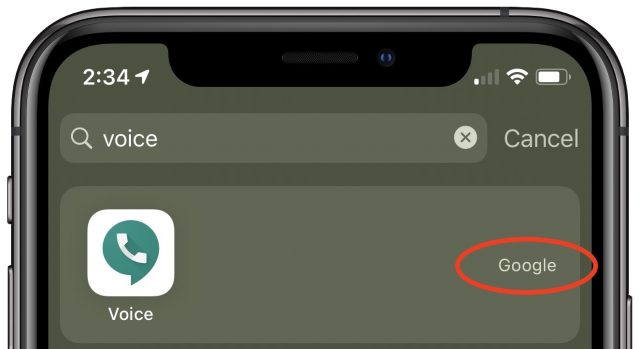
Search for an App’s Full Name to Find Its Folder
John Clark turned me on to this little fact as well. I hadn’t realized that, when you search for an app by swiping down on the Home screen and typing in the Search field, if your search reveals only a single app, iOS will also display the name of the folder that contains the found app. That gives you a better chance of being able to find the app, assuming you can find its enclosing folder.
Obviously, this trick has its limitations. If the app you want to find is strewn among your Home screens but not in a folder, no folder name appears. And if you can’t narrow the search to a single result (I have too many apps whose names start with “Weather”), you’re out of luck.
It’s also unnecessary if you’ve upgraded to iOS 14 because you can always find the app and move it to a new Home screen location from within the App Library. But for those who haven’t yet upgraded, or who are working in iPadOS, it might be helpful.
(Don’t) Use Apple Configurator 2 to Rearrange Apps from Your Mac
There is one last way that you can theoretically rearrange apps more easily—by using Apple Configurator 2 to do it from your Mac. Apple Configurator 2 is designed to help IT admins create and install profiles on multiple Apple devices at once in an institutional setting, but it also lets you rearrange the icons on your iPhone or iPad from the comfort of your Mac.
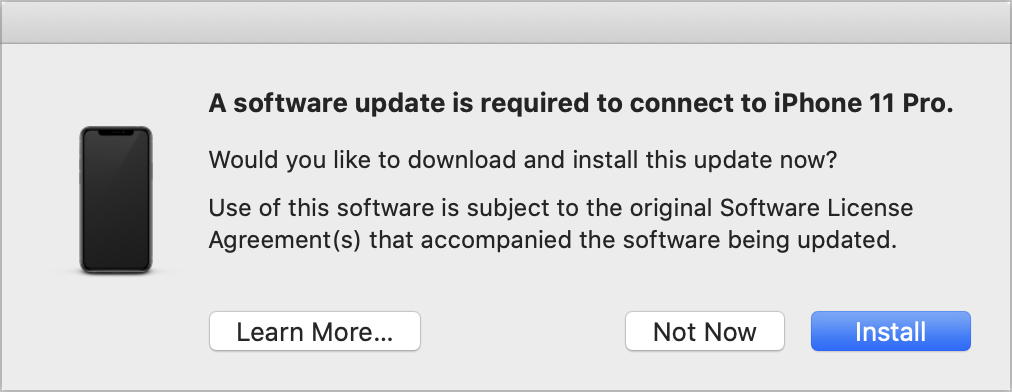
Or at least it’s supposed to. I include the instructions below in case Apple releases an update that addresses the problem, but whenever I tried to save my changes by clicking the Apply button, I got this error dialog, and my changes were ignored. Apple released version 2.13.1 of Apple Configurator 2 just a few days ago, so I would have expected it to be compatible with iOS 14, but perhaps not. Plus, it does have quite a few reviews for previous versions suggesting that the Home screen layout feature doesn’t work even when this error doesn’t appear. So don’t waste your time, or if you’re testing a new version of Apple Configurator 2, verify that it works by moving a single icon before spending much time on it.

Should it ever work, here’s how the process should go. To get started, download Apple Configurator 2 from the Mac App Store. When you first launch it with your iPhone connected via USB, you may get one of those inscrutable Mobile Device Updater dialogs that indicates your Mac lacks the software necessary to communicate with the version of iOS on your device. Unfortunately, Apple’s support note is useless, apart from confirming that it is an official alert and that there’s no problem with installing.
Once you have Apple Configurator 2 and any necessary updates installed and your iPhone connected via USB, follow these steps:
- On the first screen of Apple Configurator 2, click your device to select it.
- Choose Actions > Modify > Home Screen Layout.
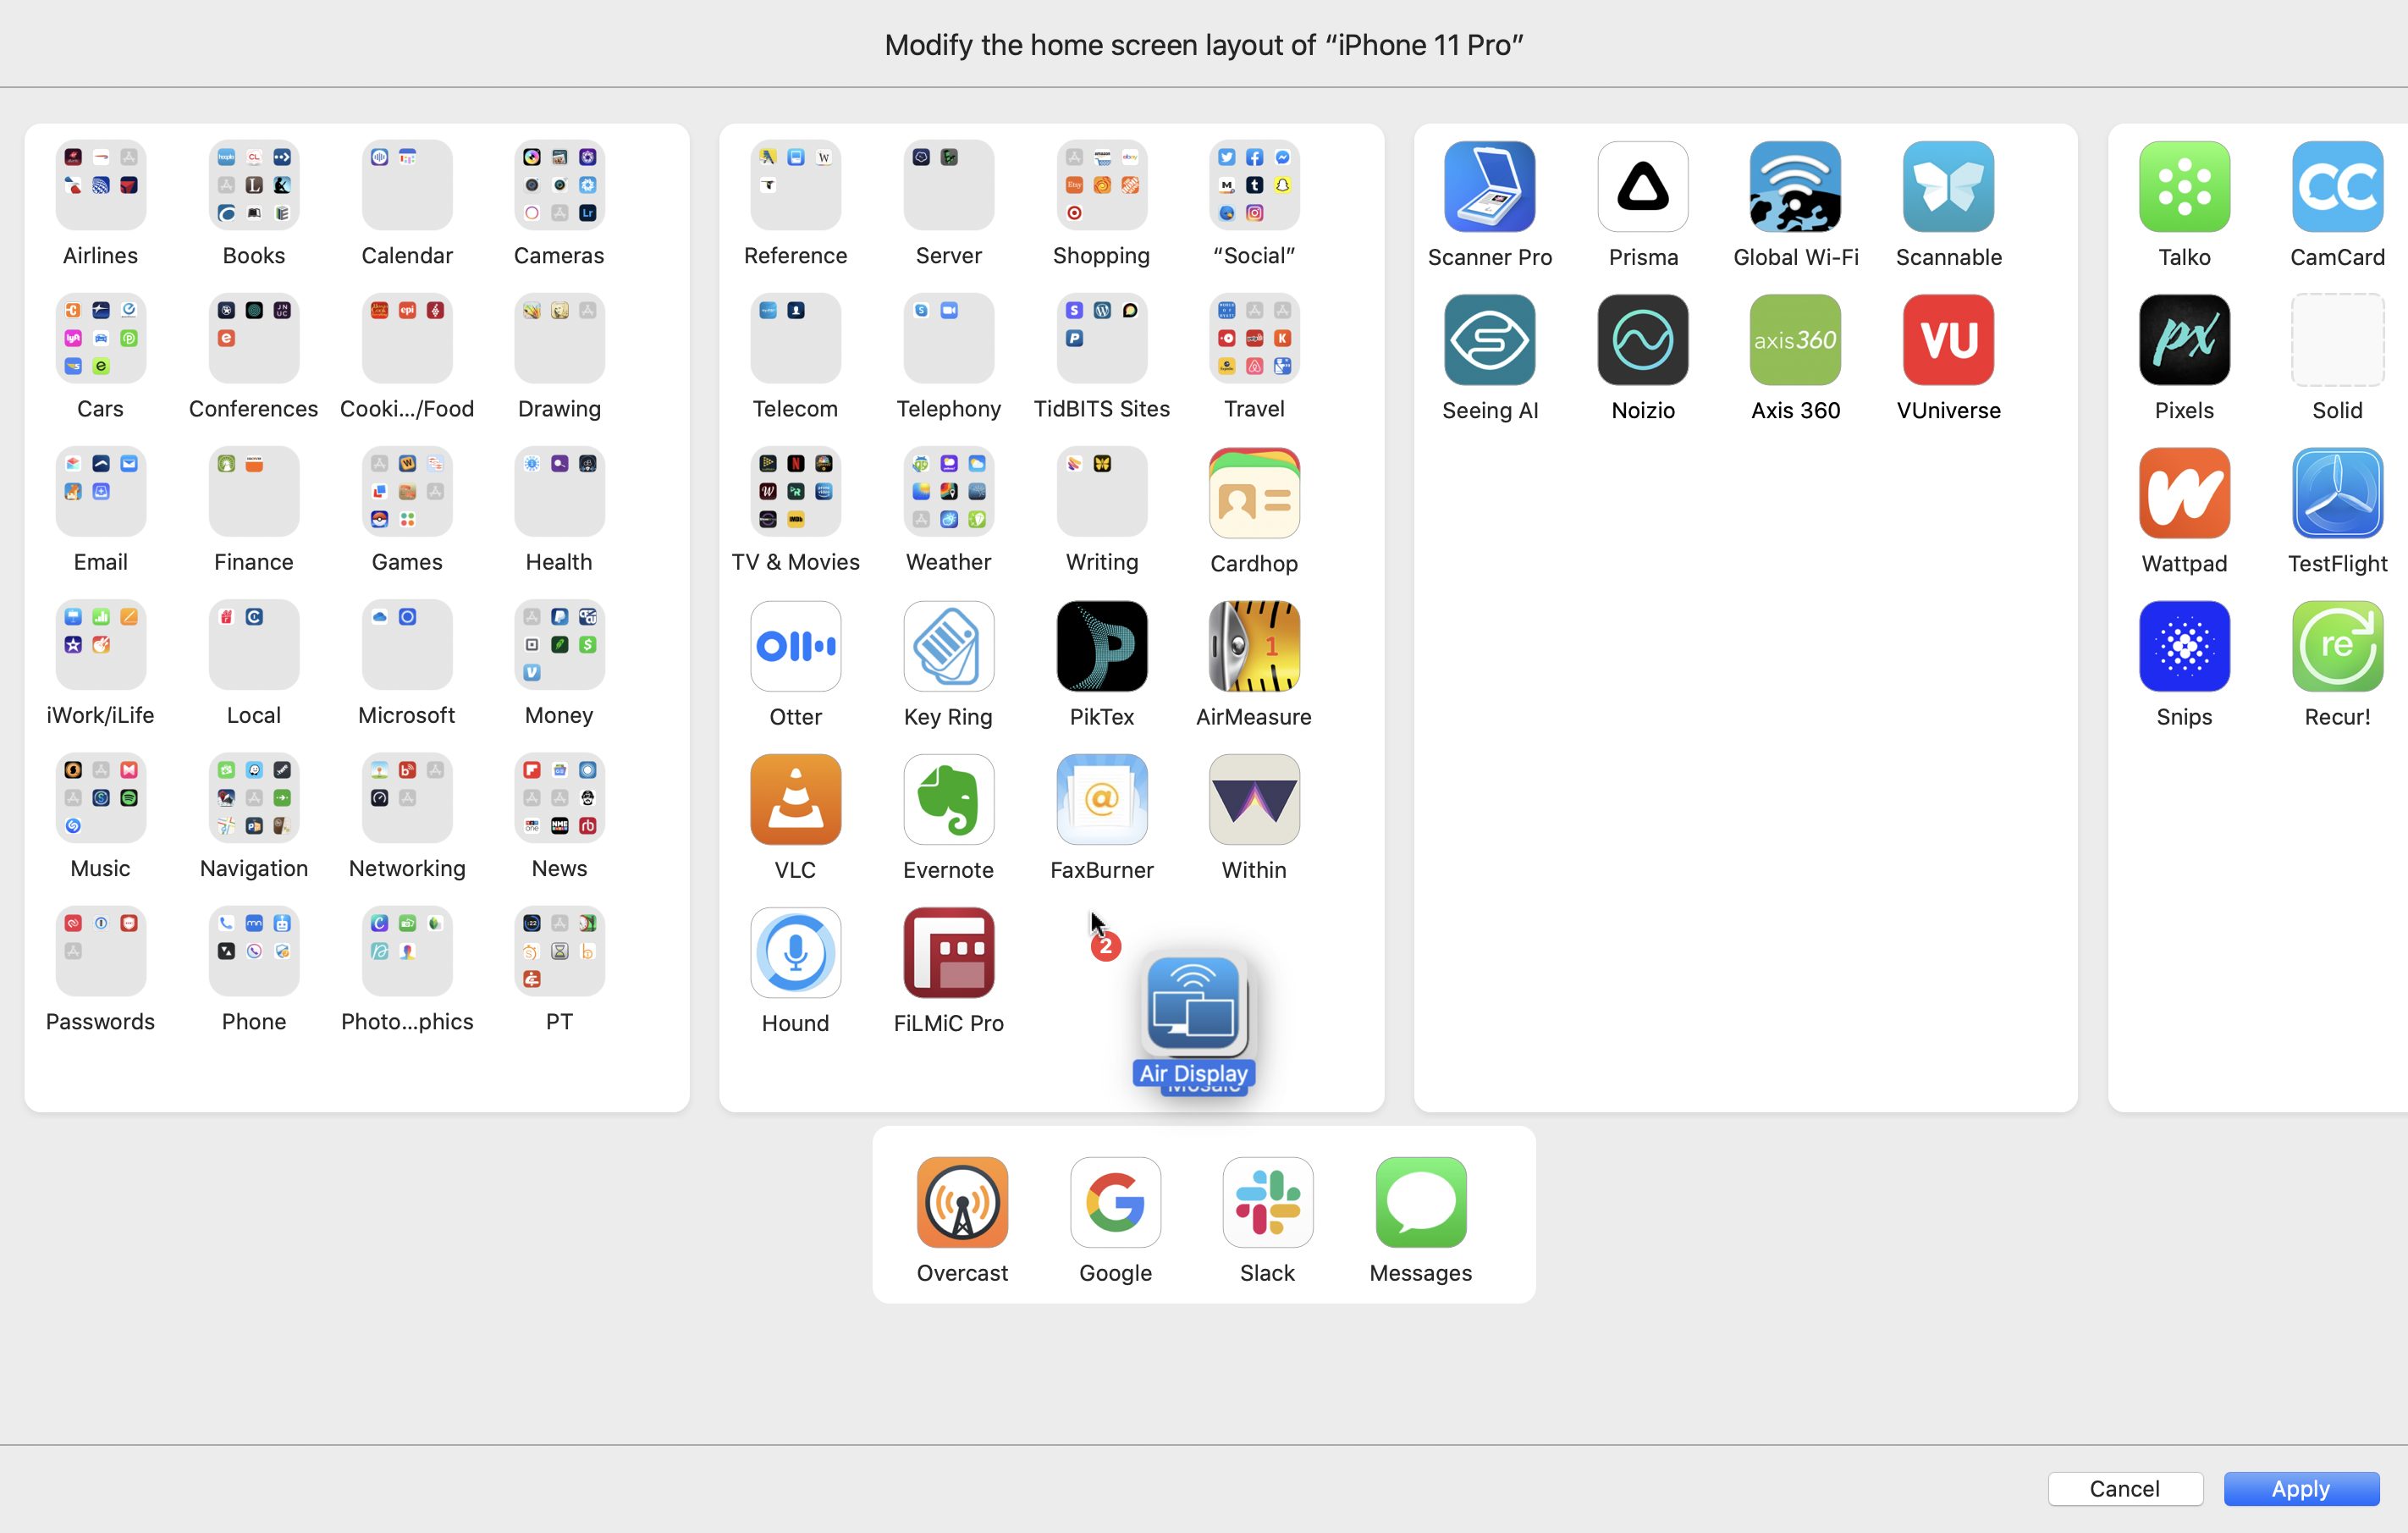
- In the sheet that appears, drag the app icons to rearrange them.
- When you’re done, click Apply.
Although it’s relatively apparent what to do, the interface has a few hidden quirks.
- There’s no indication that this is true, but the sheet displaying all your Home screens is resizable in every direction, which lets you make it much larger and easier to work with. Click and drag from any edge.
- No scroll bars appear, but you should be able to scroll left and right with trackpad or Magic Mouse 2 gestures, or with a scroll wheel. You can also drag an icon to the edge of the sheet to scroll.
- You can select multiple icons at once by Shift-clicking or dragging a rectangle around them, as you’d expect from a Mac-like icon view.
- You cannot move more icons to a Home screen than will fit on it. In other words, if you select four icons, Apple Configurator 2 won’t let you drop them on a Home screen with fewer than four open spots.
- Just as on an iPhone or iPad, drag one icon on top of another to create a folder.
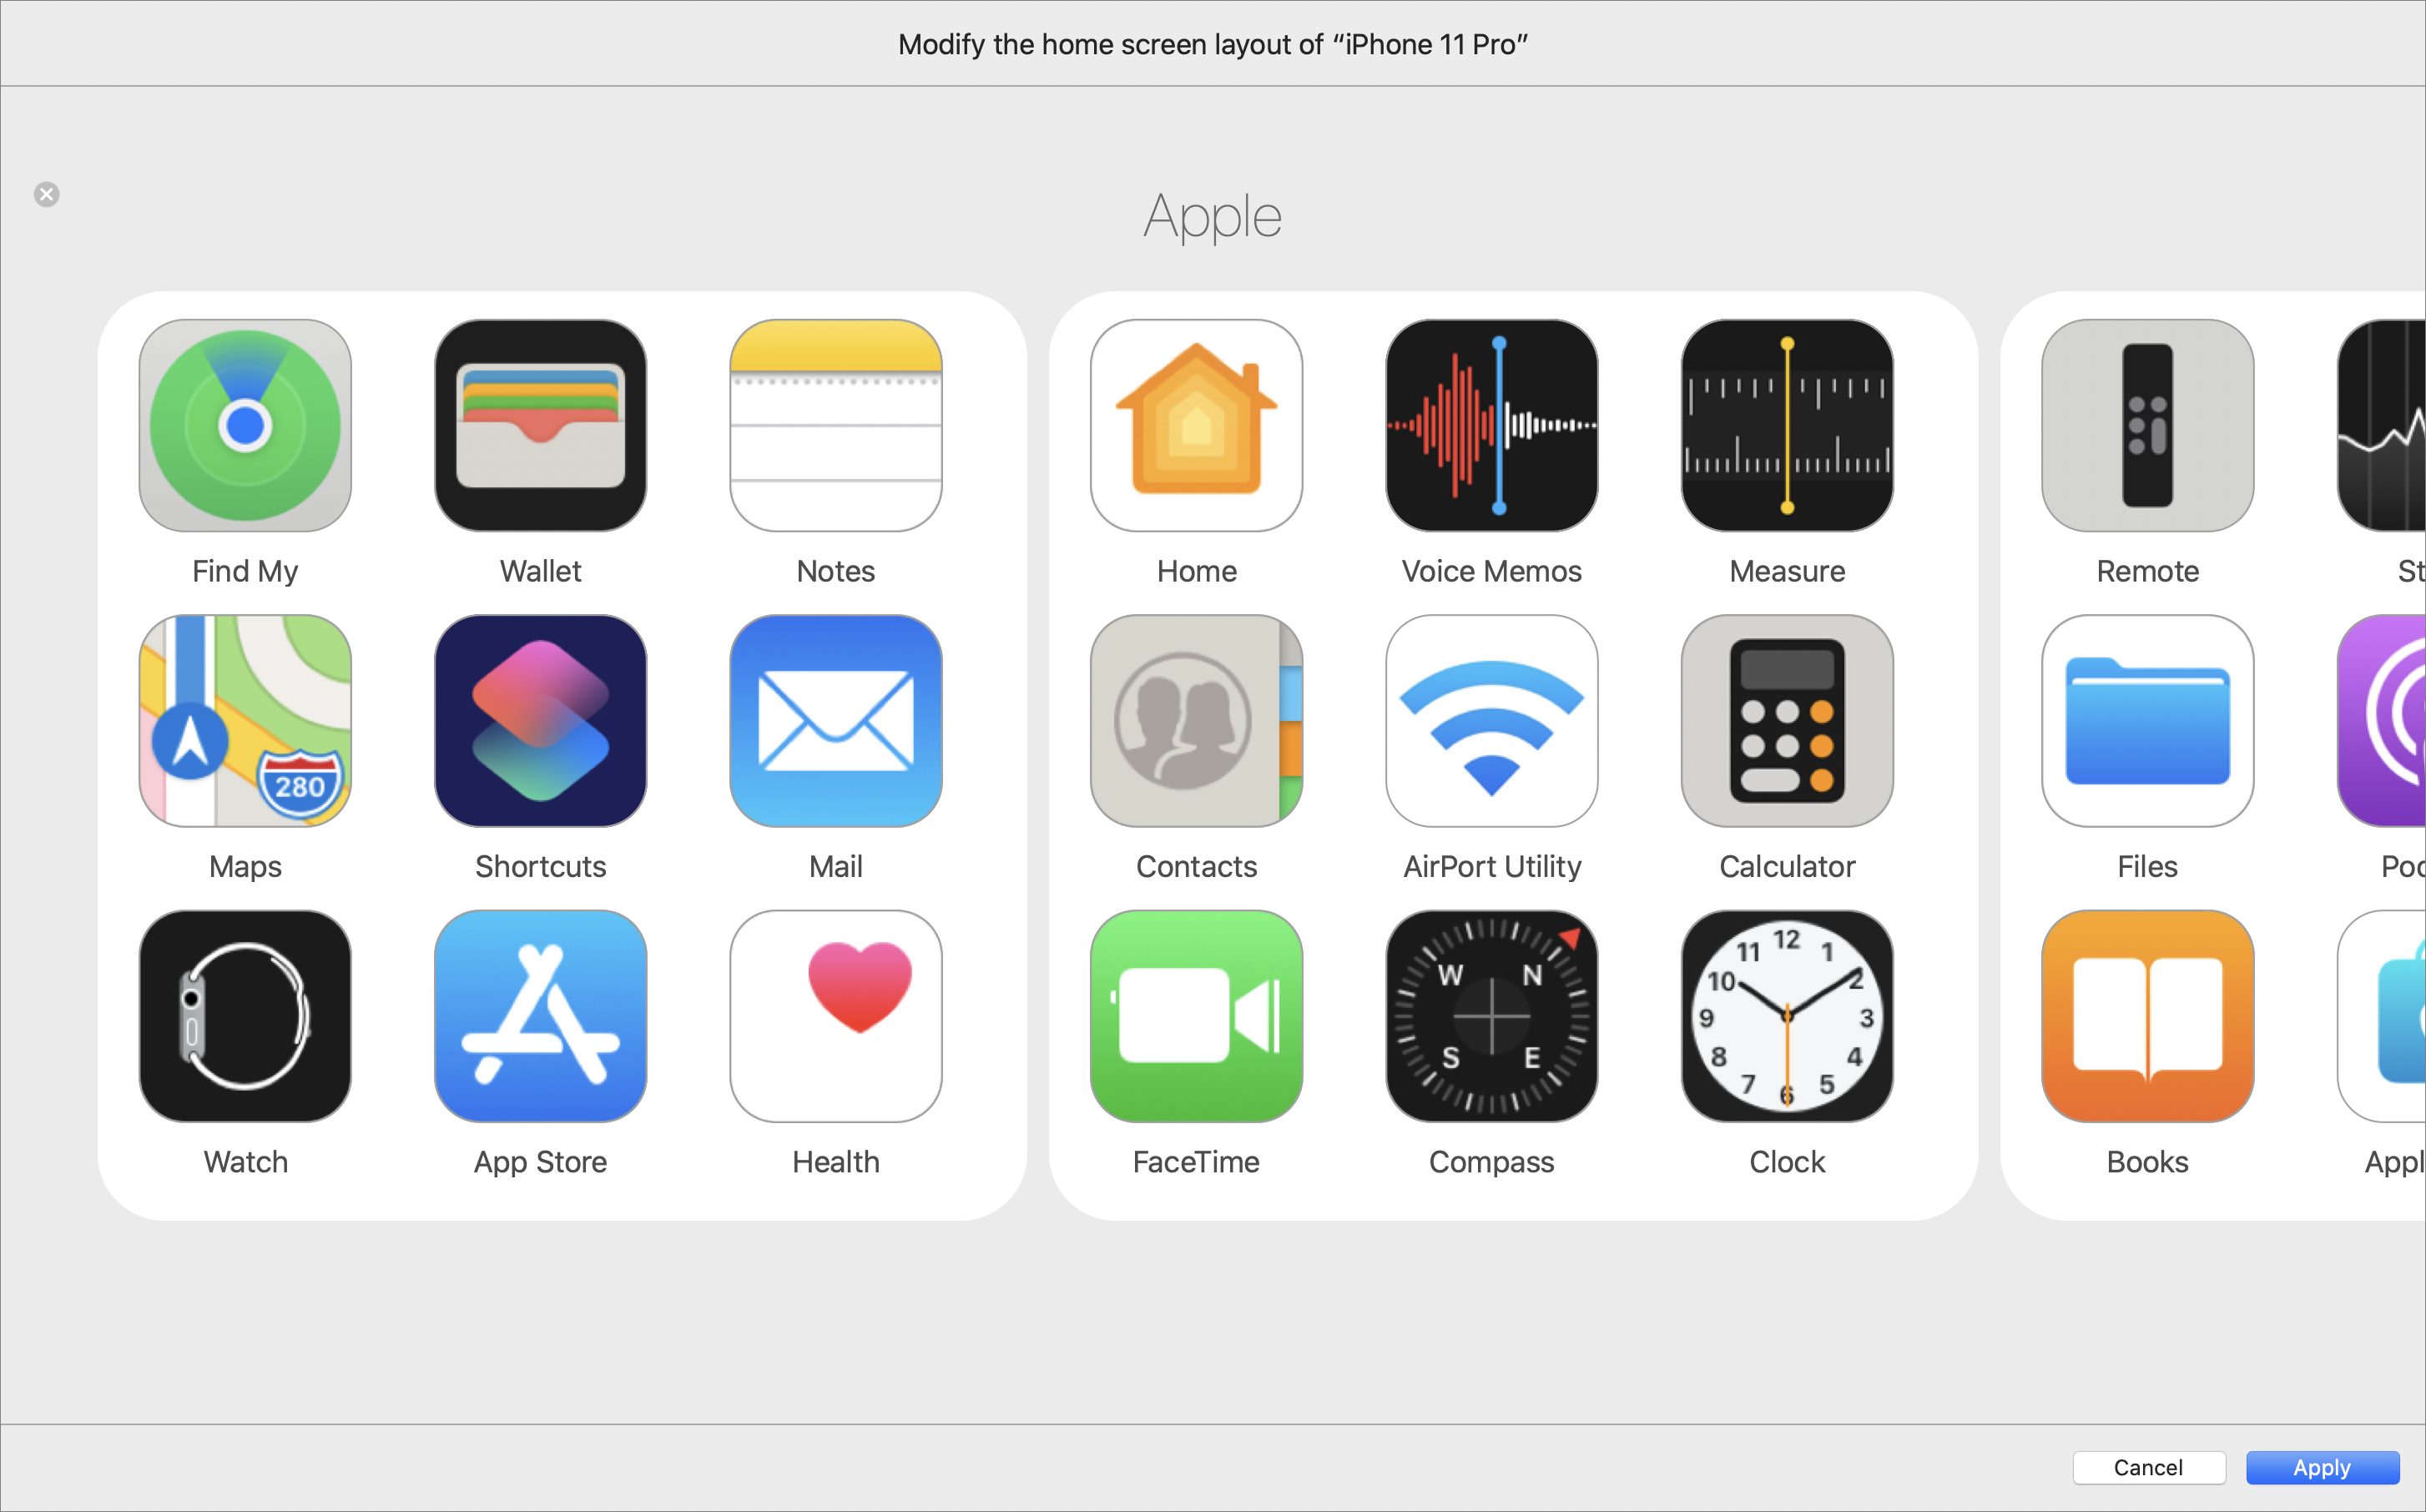
- To open a folder without adding an icon to it, double-click it.
- To navigate out of a folder, click anywhere in the gray area around the white folder outline, or click the X button in the upper-left corner. Or press the Escape key.
- To remove an icon from a folder, drag it to the X button in the upper-left corner.
Have you come up with any other tricks for rearranging or organizing apps on your iPhone or iPad? Let us know in the comments!


Sony has made it easy for Canadian consumers to preorder the PlayStation 5 Pro in Canada directly from PlayStation’s official website. Here’s how:
- Visit the Official Website: Go to direct.playstation.com and navigate to the PS5 Pro section once preorders go live on September 26, 2024.
- Create or Log in to Your PlayStation Account: If you don’t have a PlayStation account, you will need to create one. Existing users can simply log in to proceed.
- Place Your Preorder: Once logged in, follow the instructions to preorder your PS5 Pro. Ensure you have a valid payment method ready and double-check your shipping information for accuracy.
Preorder Through Major Canadian Retailers
While preordering directly from PlayStation is a popular option, you can also secure your PS5 Pro through trusted Canadian retailers. These retailers are expected to offer preorders on or after September 26:
- Best Buy Canada
- Walmart Canada
- EB Games (GameStop)
- Amazon Canada
- The Source
Steps to Preorder via Canadian Retailers:
- Visit Retailer Websites: Search for “PlayStation 5 Pro” on the website of your preferred retailer starting on September 26.
- Create or Log in to Your Account: If you’re shopping online, having an account with the retailer can speed up the preorder process.
- Preorder in Store: For those who prefer in-person shopping, check with local stores regarding availability and preorder policies.
3. Sign Up for Notifications
Many retailers and websites offer the option to sign up for notifications when the preorder goes live. If you’re worried about missing out due to high demand, this can be a useful option.
- Visit Retailer Sites: Look for a “Notify Me” or “Email Alerts” option and enter your email to stay informed.
- Use PlayStation Alerts: Sign up for notifications directly through Sony to be one of the first to know when preorders are available.
4. Prepare for High Demand
Preordering the PS5 Pro is expected to be competitive, with high demand likely to result in quick sellouts, just as with the initial release of the original PS5. To maximize your chances of securing a preorder:
- Act Quickly: Be prepared to place your order as soon as preorders open. Timing is key, as stock can run out within minutes.
- Double-Check Payment Information: Ensure your credit card or payment method is ready to go. Any delays during the checkout process could result in losing your spot.
- Stay Informed: Monitor PlayStation and retailer websites for updates on restocks or additional preorder windows.
Final Thoughts
The PlayStation 5 Pro is set to take gaming to the next level with its enhanced performance, graphics, and new features. Canadian gamers should be ready to act fast when preorders open on September 26, 2024, to secure their console ahead of the holiday season. Whether you choose to preorder through PlayStation’s official website or your preferred retailer, following the steps outlined above will help ensure a smooth and successful preorder experience.
For more details on the PS5 Pro and to preorder, visit direct.playstation.com or stay tuned to updates from major Canadian retailers.
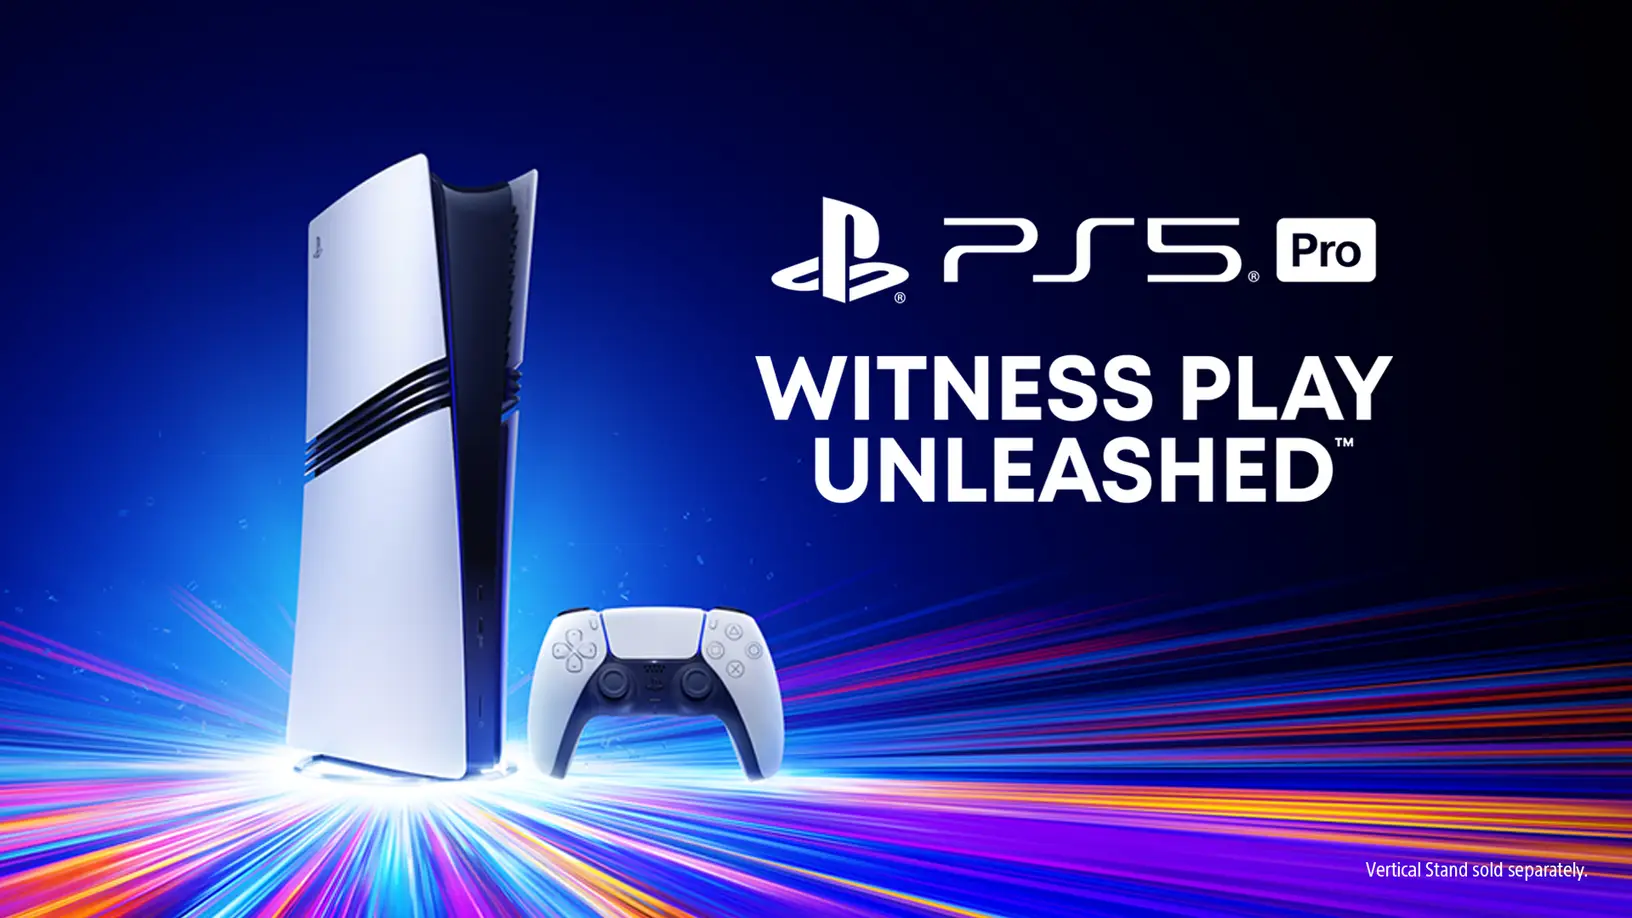
Since the PlayStation 5 (PS5) launched four years ago, PlayStation has continuously evolved to meet the demands of its players. Today, we are excited to announce the next step in this journey: the PlayStation 5 Pro. Designed for the most dedicated players and game creators, the PS5 Pro brings groundbreaking advancements in gaming hardware, raising the bar for what’s possible.
Key Features of the PS5 Pro
The PS5 Pro comes equipped with several key performance enhancements, addressing the requests of gamers for smoother, higher-quality graphics at a consistent 60 frames per second (FPS). The console’s standout features include:
- Upgraded GPU: The PS5 Pro’s GPU boasts 67% more Compute Units than the current PS5, combined with 28% faster memory. This allows for up to 45% faster rendering speeds, ensuring a smoother gaming experience.
- Advanced Ray Tracing: Ray tracing capabilities have been significantly enhanced, with reflections and refractions of light being processed at double or triple the speed of the current PS5, creating more dynamic visuals.
- AI-Driven Upscaling: Introducing PlayStation Spectral Super Resolution, an AI-based upscaling technology that adds extraordinary detail to images, resulting in sharper image clarity.
- Backward Compatibility & Game Boost: More than 8,500 PS4 games playable on PS5 Pro will benefit from PS5 Pro Game Boost, stabilizing or enhancing performance. PS4 games will also see improved resolution on select titles.
- VRR & 8K Support: The PS5 Pro supports Variable Refresh Rate (VRR) and 8K gaming for the ultimate visual experience, while also launching with the latest wireless technology, Wi-Fi 7, in supported regions.
Optimized Games & Patches
Game creators have quickly embraced the new technology that comes with the PS5 Pro. Many games will receive free updates to take full advantage of the console’s new features, labeled as PS5 Pro Enhanced. Some of the highly anticipated titles include:
- Alan Wake 2
- Assassin’s Creed: Shadows
- Demon’s Souls
- Dragon’s Dogma 2
- Final Fantasy 7 Rebirth
- Gran Turismo 7
- Marvel’s Spider-Man 2
- Ratchet & Clank: Rift Apart
- Horizon Forbidden West
These updates will allow players to experience their favorite games at a higher fidelity, taking full advantage of the console’s improved graphics and performance.


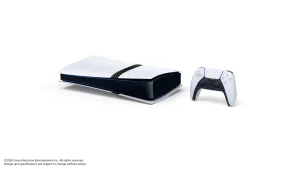
Design & Compatibility
Maintaining consistency within the PS5 family, the PS5 Pro retains the same height and width as the original PS5 model. Players will also have the option to add an Ultra HD Blu-ray Disc Drive or swap console covers when available.
Additionally, the PS5 Pro is fully compatible with all existing PS5 accessories, including the PlayStation VR2, DualSense Edge, Pulse Elite, and Access controller. This ensures seamless integration into your current gaming setup.
Pricing & Availability
The PS5 Pro will be available starting November 7, 2024, at a manufacturer’s suggested retail price (MSRP) of:
- $699.99 USD
- $949.99 CAD
- £699.99 GBP
- €799.99 EUR
- ¥119,980 JPY
Each PS5 Pro comes with a 2TB SSD, a DualSense wireless controller, and a copy of Astro’s Playroom pre-installed. Pre-orders begin on September 26, 2024, and the console will be available at participating retailers and directly from PlayStation via direct.playstation.com.
The launch of the PS5 Pro marks a new chapter in PlayStation’s commitment to delivering cutting-edge gaming experiences. Whether players choose the standard PS5 or the PS5 Pro, PlayStation aims to provide the best possible gaming experience for everyone.
Preorder your PS5 Pro and step into the next generation of gaming this holiday season.
Google has launched its next generation of Pixel phones, setting the stage for a head-to-head competition with Apple as both tech giants aim to integrate more advanced artificial intelligence (AI) features into their flagship devices. The unveiling took place near Google’s Mountain View headquarters, marking an early debut for the Pixel 9 lineup, which is designed to showcase the latest advancements in AI technology.
The Pixel 9 series, although a minor player in global smartphone sales, is a crucial platform for Google to demonstrate the cutting-edge capabilities of its Android operating system. With AI at the core of its strategy, Google is positioning the Pixel 9 phones as vessels for the transformative potential of AI, a trend that is expected to revolutionize the way people interact with technology.
Rick Osterloh, Google’s senior vice president overseeing the Pixel phones, emphasized the company’s commitment to AI, stating, “We are obsessed with the idea that AI can make life easier and more productive for people.” This echoes the narrative Apple is likely to push when it unveils its iPhone 16, which is also expected to feature advanced AI capabilities.
The Pixel 9 lineup will be the first to fully integrate Google’s Gemini AI technology, designed to enhance user experience through more natural, conversational interactions. The Gemini assistant, which features 10 different human-like voices, can perform a wide array of tasks, particularly if users allow access to their emails and documents.
In an on-stage demonstration, the Gemini assistant showcased its ability to generate creative ideas and even analyze images, although it did experience some hiccups when asked to identify a concert poster for singer Sabrina Carpenter.
To support these AI-driven features, Google has equipped the Pixel 9 with a special chip that enables many AI processes to be handled directly on the device. This not only improves performance but also enhances user privacy and security by reducing the need to send data to remote servers.
Google’s aggressive push into AI with the Pixel 9 comes as Apple prepares to unveil its iPhone 16, which is expected to feature its own AI advancements. However, Google’s decision to offer a one-year free subscription to its advanced Gemini Assistant, valued at $240, may pressure Apple to reconsider any plans to charge for its AI services.
The standard Pixel 9 will be priced at $800, a $100 increase from last year, while the Pixel 9 Pro will range between $1,000 and $1,100, depending on the model. Google also announced the next iteration of its foldable Pixel phone, priced at $1,800.
In addition to the new Pixel phones, Google also revealed updates to its Pixel Watch and wireless earbuds, directly challenging Apple’s dominance in the wearable tech market. These products, like the Pixel 9, are designed to integrate seamlessly with Google’s AI-driven ecosystem.
Google’s event took place against the backdrop of a significant legal challenge, with a judge recently ruling that its search engine constitutes an illegal monopoly. This ruling could lead to further court proceedings that may force Google to make significant changes to its business practices, potentially impacting its Android software or other key components of its $2 trillion empire.
Despite these legal hurdles, Google is pressing forward with its vision of an AI-powered future, using its latest devices to showcase what it believes will be the next big leap in technology. As the battle for AI supremacy heats up, consumers can expect both Google and Apple to push the boundaries of what their devices can do, making the choice between them more compelling than ever.

Alouettes receiver Philpot announces he’ll be out for the rest of season

David Lipsky shoots 65 to take 1st-round lead at Silverado in FedEx Cup Fall opener

Canada’s Marina Stakusic advances to quarterfinals at Guadalajara Open
12 Bizarre Things People Did Just To Make Social Media Content
dynaCERT Inc. Invites You to Join Us at the Vancouver Resource Investment Conference | INN – Investing News Network

AP source: Bears acquiring quarterback Nick Foles from Jaguars – Sportsnet.ca

-

 News13 hours ago
B.C. to scrap consumer carbon tax if federal government drops legal requirement: Eby
-
News13 hours ago
A linebacker at West Virginia State is fatally shot on the eve of a game against his old school
-
Sports14 hours ago
Lawyer says Chinese doping case handled ‘reasonably’ but calls WADA’s lack of action “curious”
-
News24 hours ago
Reggie Bush was at his LA-area home when 3 male suspects attempted to break in
-
News14 hours ago
RCMP say 3 dead, suspects at large in targeted attack at home in Lloydminster, Sask.
-
News13 hours ago
Hall of Famer Joe Schmidt, who helped Detroit Lions win 2 NFL titles, dies at 92
-
Sports8 hours ago
Canada’s Marina Stakusic advances to quarterfinals at Guadalajara Open
-
News14 hours ago
Bad weather and boat modifications led to capsizing off Haida Gwaii, TSB says


